Deploying a key
To deploy your key for distribution via CD or the Internet, choose Deploy Key… from the File menu.
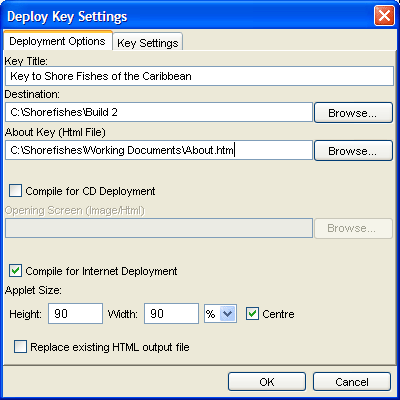
The Deploy Key Settings dialog box has two tabs – Deployment Options and Key settings – and provides the following options and settings for deploying a key:
Deployment Options
Key Title
Enter a name for the key. The name should be short and appropriate, such as Key to Mangroves of Australia, Fly Families of the World or Common Diseases of Rice in South-east Asia. The key title is displayed as the header of the key window when the key is played in the Lucid Player, as the name of the key’s web page when the key is deployed as an applet, and as the base name for the key’s files and folders.
Destination
Enter a path name for the folder where you want your key to be compiled, or click the Browse button to select a folder. If a key with the same name already exists in the selected folder you will be warned, and will be able to cancel before overwriting.
About Key
If necessary, choose the About page for the key. The Attach HTML File dialog allows you to browse for the HTML file to open. Note that you may only select a HTML file from within the key’s HTML folder – if you have created an About page for the key using an external HTML editor, you must save the page to the key’s html directory.
Opening Screen
When compiling for stand-alone deployment, select a HTML page from within the key’s html folder or an image file (any location) which is to be the opening screen for the key when displayed within the Lucid Player.
Compile for CD Deployment
Check “Compile for CD Deployment” to compile the key for the application version of the Lucid Player. The key will be deployed to a folder from where it can be written to CD.
The compiled key will be copied within the destination folder. Along with an installation HTML page that your key users use to install the Lucid3 Application player.
Note: You may customise this page to suit your key's look and feel.
Note: When burning a key to CD, only the contents of the destination folder should be copied. Do not include the destination folder itself.
Compile for Internet Deployment
Check “Compile for Internet Deployment” to compile the key wrapped in a web page, along with the applet version of the Lucid Player, for easy distribution on the Internet. The key will be deployed to a folder which can be copied to a web server. Note that the Builder will not deploy directly to a remote server.
Note that the Builder will not deploy directly to a remote server unless for example there is a direct connection to the network location via a drive share.
Two subfolders and a web (HTML) page will be created in the nominated desination folder. The key subfolder contains all files associated with the key, while the lucid_player subfolder contains the applet version of the Player. Files contained within these two folders should not be modified. The web page will be named keytitle.html, where keytitle is the title of the key as specified above.
To distribute the key via the Internet, upload these two folders and the web page to a web server. The web page and folders must be kept together to work correctly. If you need to change the location of either subfolder relative to the web page you will need to edit the web page to reflect the change. Your system administrator may need to do this.
The web page created by Lucid for internet deployment may be customised by editing it to include other content wrapped around the applet. You should have a good working knowledge of HTML or consult a web designer before attempting this.
Note that users must have the Java Virtual Machine 1.4.2 or greater installed to be able to view the key. You may need to provide information about this on your web page. See the topic Java – what does it mean? for more information.
Applet Size
This option allows you to set the height and width of the applet within its enclosing web page. It can be set as a percentage of the web page size or as an absolute size in pixels. Checking the Centre checkbox will horizontally centre the applet.
Replace existing HTML output file
If this box is checked a new web page will be created for the key, and any web page previously created and customised will be overwritten. If the box is unchecked any existing web page will not be overwritten, but the key’s files will be updated.
Key Settings
Options in Key Settings allow you to specify aspects of the behaviour of your key when opened in the Lucid Player. In all cases, the key user can change these settings when using the player. For more information, consult the Lucid3 Player Help.
The checkboxes on this page are set for the most common and sensible options for most keys opened in the Player. You should understand and carefully consider the implications of changing any of these settings.

Allow Misinterpretations
With Allow Misinterpretations checked, the Player will be set to treat entities scored using the By Misinterpetation scores in the same way as ones scored using Common and Rare. This is the correct behaviour for normal identification as it allows you to pre-empt likely mistakes made by a user.
With Allow Misinterpretations unchecked, the Player will be set to treat entities scored using the By Misinterpretation scores in the same way as ones scored as Absent.
See the topic Present by misinterpretation for more information.
Retain uncertainties
With Retain Uncertains checked, the Player will be set to treat entities scored as Uncertain for a feature in the same way as ones scored as Common. This is the correct behaviour for normal identification.
With Retain Uncertains unchecked, the Player will be set to treat entities scored as Uncertain for a feature in the same way as ones scored as Absent.
See the topic Uncertain for more information.
Match Method
In the Lucid3 Player, the Match Method determines the way in which the selection of one or more states of a feature results in entities being retained or discarded. See the Player Help for more information.
Match Any State
With Any State checked, the Player will be set to use the Any State match method. Under this method, an entity scored for several states of a feature will be retained in Entities Remaining if any of its scored states is selected. This is the default mode for normal identifications.
For instance, if a key has a feature Flower colour with states white, cream, yellow, red, and blue, and a user selects white and cream, Entities Remaining will list all entities with white or cream flowers.
Match All States
With All States checked, the Player will be set to use the All States match method. Under this method, an entity scored for several states of a feature will be retained in Entities Remaining only if all its scored states are selected.
For instance, if a key has a feature Flower colour with states white, cream, yellow, red, and blue, and a user selects white and cream, Entities Remaining will list only entities scored for both (and only) white and cream flowers.
Automation Options
In the Lucid3 Player, two functions – Best and Prune Redundants – can be automated so they are invoked after each state is selected. See the Player Help for more information.
Auto Best
Check Auto Best to set the Player to invoke the Best function automatically after each state is selected.
Auto Prune
Check Auto Prune to set the Player to invoke the Prune Redundants function automatically after each state is selected.
Sorting Mode
In the Lucid3 Player, the Match Mode determines the way in which entities are handled in the Entities Remaining list. See the Player Help for more information.
Filtered
Check Filtered to set the Player to use the Filtered match mode. Under this mode, entities that do not match the selected states are moved from Entities Remaining into Entities Discarded.
Ranked
Check Ranked to set the Player to use the Ranked match mode. Under this mode, all entities are kept in Entities Remaining, with each entity annotated with a value indicating the percent match to the selected states, and the list ranked from highest match to lowest.
View Options
Tree View (default)
See Trees and Lists
List View
See Trees and Lists
Multimedia Icons (default)
For each item that that has HTML and/or images attached an icon will be shown. No image icon will be shown if the show Image Thumbnails is set.
Image Thumbnails (default)
For items that have attached images a 50 x 50 pixel thumbnail of the attached default image will be shown directly within the trees.